Showing posts with label 5th grade. Show all posts

Sunday, April 29, 2012

Weaving a Bulletin Board Backdrop

A weaving bulletin board from my first year teaching gained new attention this year when bulletin board blogs and pinterest pins brought viewers to the display.

Last week, I decided to revamp the concept for a display of 5th grade reused bag weavings.


I like the bold graphic look of the black and white checkerboard on the exposed cork.
I also love how the board is a 3-dimensional demonstration of weaving.

On the opposite board, I simply displayed some of the weavings in a staggered arrangement.


Wednesday, November 9, 2011

Gorilla, what?

You know that moment, when the students aren't working on their projects. There's even a group clumped together, out of their seats, and they're all off-task.

Kids, get back to work.

But Miss M, Joey drew a gorilla!

Umm what? How did he manage to draw a gorilla? He should be drawing his Modigliani self-portrait...

And then I went to check it out, and, well, he had drawn a gorilla! I mean, in the same way that people find a potato chip shaped like the Virgin Mary or a grilled cheese with the face of Jesus, yes, Joey had in fact managed to accidentally draw a gorilla as he was coloring his neck.

At which point in time, I became the off-task teacher who went to get the camera and document this masterpiece.

Sunday, May 29, 2011

RE(used) Weavings

I like weaving. I expose the students to different types of weaving every year except 4th grade. Two years ago, 5th grade made weavings out of watercolor experiments with warm and cool colors. Last year, I opted for a different weaving experience. We made cardboard looms, then wove with plastic bags---a great way to reuse disposable grocery bags! While I have some bags available in common colors (black, white, and red---the color most often used by vegetable vendors), the fun is seeing what students are able to find in their own homes! Baby blue, orange, pink, yellow, green, even metallic silver! Thin plastic works best, though we take whatever we can get. After they've warped their loom with translucent bags, they weave back and forth with strips cut from their colorful collections. Rare colors become extra valuable, with students trading and sharing their treasures. I emphasize a limited color palette (4-5 colors) and suggest patterning, but neither consideration is a requirement.


To finish off the project, students tie two warp strings together, then use extra strips of bags to create fringe.

This year, we had a little extra fun and donned appropriate headgear while weaving.

Friday, April 22, 2011

Advertisements as Art

        To make art.
        To look at art.
        To think about art.
        To speak about art.

During my first methods class, I observed a recent grad teaching at an elementary school in Phoenixville, Pennsylvania. Something she said stuck with me. She told me that most adults don't spend their time making art, but they do look, think, and speak. She wanted to teach her students how to interact with art for the rest of their life, and in the manners in which they would interact---looking, thinking, speaking---not just making!

Of course there is a place for making. I spend most of my art classes making. But I've also expanded what we make beyond your traditional fine art.

Design education
is a huge topic and I won't begin to scratch the surface, but one way to think about it is making images (2D), objects (3D), places (3D), and experiences (4D). My students are exposed to graphic design (images), product design (objects), and architecture (places).

To begin to understand principles of art in graphic design, 5th graders analyze magazine advertisements. They sketch layouts, identify color palettes, and answer questions about style (text and images) and principles (repetition, emphasis, balance, proportion). Student then use a favorite advertisement as a template for advertising one of our Expected Schoolwide Learning Results (ESLRs).

The students create their advertisements in PowerPoint. We change the slide size and orientation, then use AutoShapes, Clip Art, and Text Boxes to create the ad. I like that the program is quicker to pick up than Photoshop, Illustrator, or InDesign. The skills they learn will transfer well to other Microsoft programs, which is handy as they enter middle school.

I do not allow the students to get images on the internet for numerous reasons, including the questionable results sprinkled in any Google image search and the quality of most of the images. If they cannot find what they want in clip art, I search for free stock photos and drop them into their folder on the network. I also give them access to the school logo and the newly designed ESLR icon.


This ad is one of my favorites. I love the use of the ESLR icon above the words. Perfect substitute for the heart!


After the images are added, I let the students vary from the original color palette. This girl decided to make her advertisement more interesting by eliminating the all-white background and adding more layers.


We don't exactly have a baseball program at our school, but I like this advertisement about learning good sportsmanship in PE class.


Po, from our production of Snow White and the Seven Dwarfs, made this advertisement. He gave me a shout-out in his ad! He replaced Benjamin Bratt's name with his own name and "Inspired by a True Story" with "Inspired by Miss M." Unfortunately, I asked all the students to remove their names from the posters, only identifying the posters by our school, and not by the designer.


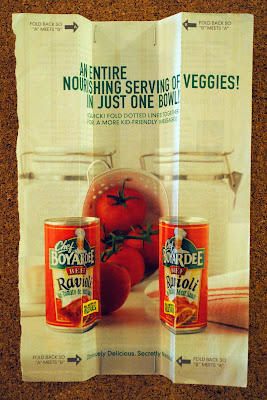
The Captain (Doc) from Snow White just loved this interactive advertisement. He suggested using the ESLR icon in place of the can of Chef Boyardee, which prompted me to make the icon available to all the students. We carefully crafted a phrase that would work on his advertisement both when folded and unfolded. I love the final result!


Sunday, February 13, 2011

(masterpieces) Paul Modigliani

I pull ideas for lessons from all aspects of my life. I draw on experiences growing up, books I've read, teachers I've observed, courses at university, and other art teachers with whom I interact (friends, coworkers, blogs, etc.). Often another person's project is just an inspiration point that jumps me to a completely different idea for a lesson. Other times, I adapt the lesson to fit into my scope and sequence and work for my international crowd. This lesson is one of the few I've done with very little tweaking. The weeks prior are spent studying proportions in the human figure and creating wire sculptures. To transition into this project, we observe accurate facial proportions on photos of various people.

          Where are the eyes?
          How long is the nose?
          Where are the ears?

Switching to the work of Amedeo Modigliani, I tell a brief background of his life. Having just studied proportions, they quickly point out the differences (placement of eyes, length of nose, length of neck, rounded shoulders, etc.). So was he a bad artist or did people look like that 100 years ago? We eventually decide that distortion (like we observed when our wire sculpture's arms got too long or head got too fat) can be intentional, not just a mistake. Following in Modigliani's steps, we create distorted self-portraits in oil pastels on black paper.

As a final exploration of distortion, we visit the Mac lab to play with preset distortions in Photobooth and use iWarp in Gimp to distort self-portrait photos (taken with the Mac's built-in camera).

(teacher's note) 5th grade spent the last few weeks working on proportions—creating sculptures and drawings with realistic sizes! After studying the correct facial proportions, they looked at the portraits of Amedeo Modigliani, an Italian artist. 5th grade used the same style to create their own Modigliani self-portraits. Be sure to notice the long necks, round shoulders, long noses, and eyes that are too high on the face! Paul entitled his project Paul Modigliani.

Sunday, August 31, 2008

One Full Week!

This week was the first FULL WEEK with students.

Five student days.

I'd like to say it was nothing, didn't wear me out or anything.

In all honesty, I was so excited for Friday to finally come! And then, just in time for the weekend, some sort of bug knocked me out COMPLETELY on Saturday. All day Saturday...I'll spare you the details.

Thankfully, I started feeling better this morning, so I had all day to sleep, start to eat, and regain my strength for ANOTHER FIVE DAY WEEK! But I did miss having a weekend, where I could do things for myself...

Check out the picture below! I came in last Monday to find a BRAND NEW CEILING AND LIGHTING in my art room. I was told that they would be putting in new lights, but I didn't realize the lights and drop ceiling would come at the same time. I don't have much of an opinion about the ceiling. It looks nice, and that extra 2 or 3 feet would never have been used. This is supposed to help with heating and cooling costs, and now I have better lighting!


Probably the biggest news for this week is that I'm teaching the Pre-K class! Once a week, for 30 minutes. It's a small little class of 7 students. One girl cried hysterically about coming to art class. Thankfully, one of the classroom teachers stayed and sat with her. About 5 or 10 minutes into class, she finally stopped crying.

It's a fun class, especially since I have four of my colleagues' children as students. Two of the boys' dads work in the secondary building. One little girl's dad is a music teacher and the head of fine arts. And another little boy, his dad is my principal, the principal of the elementary school.

Pre-K was learning about colors in their class. We practiced our cutting skills by playing "HIDE AND SEEK" and finding the colors that were hiding in magazines.

The yellow table cut out yellow items.
The red table cut out red items.
The blue table cut out blue items.

Then a teacher helped each table glue their bits onto construction paper. The classroom teacher that stayed helped the yellow table, my TA helped the red table, and I helped the blue table.

My principal's son was sitting at the blue table. At one point in time, I thought he said "I like you." Then I realized, he was probably saying "I like blue" since he was sitting at the blue table and cutting out blue items. A few minutes later, I was helping him cut out some more items. This time, it was clear as day. "I like you." Yes, this little four year old boy likes me.

He also likes my scissors. They spring open to help young children with their fine motor skills...

He saw me two days later, on Friday, pointed at me and told the person he was with "I like her."


Here are the finished Olympic bulletin boards---designed and created by the 5th grade classes.

I'm so impressed.

Nearly everything is their own creation. I stapled the items on the board, with their direction. I also created the flag of South Africa on the first bulletin board. (It's fairly complicated, and the students were struggling, but since our secondary principal is from South Africa, I thought I'd help them out!)

I love the way the first bulletin board combined the Olympic rings and the word "Olympics." Genius.

And check out the finished torches on the second bulletin board...those torches are the result of rulers, protractors, "paper and pencil" math calculations, mental math, and research at home! (One boy from the group printed out color images of the torches at home and brought them in for the second class so they could get all the details perfect.)


Lastly, some finished hand designs from the 2nd graders and the 2nd/3rd grade ESL class.


This girl really impressed me. The front of her book is beautiful. She finished early, so she began designing the back. I didn't ask the students to think about the arrangement of hands on the front cover, but merely to overlap the hands to cover the entire page. She took this to the next level when she designed her back cover. It's things like this back cover that make you smile and realize your students are learning, applying their understanding independently, taking risks, and finding success!


I read this passage in The Art of Teaching Art to Children on Friday night:

Sometimes the art room gets really quiet. It's the tip-0ff that the kids are deeply involved. I haven't asked the children to be quiet. They are simply expressing their involvement in the work by a high level of intensity, combined with a deep focus. They are immersed in the art materials and in themselves.

I started tearing up. Already, there have been many quiet classes in the art room. I love to facilitate this type of involvement in art, in the process of creation!


Sometime, I need to write about 3rd grade. They're awesome! The discussions we have about art, their increasing drawing skills, and the crazy portraits they're drawing of their classmates...it's a great time!

Search This Blog

Total Pageviews


  © Blogger template Shush by Ourblogtemplates.com 2009

Back to TOP