Saturday, November 22, 2008

Funny Moments

I was trying to decide today which class is my favorite. I can't decide. I'm like the mom that says "all of you are my favorite" or "I don't have a favorite."

I was also thinking about funny moments this year. A few teachers were talking about those moments when you just crack up in class and can't stop laughing. I have a lot of fun in art class, but not so many moments of huge laughter, so much that it disturbs class.

I did have one really fun class when I totally lost my composure. 4th grade had come for class. The music classes nearby and cafeteria were a little loud. I knew I wanted to talk for a while at the beginning of class, so I decided I should close the door to block the noise. All the students were sitting, and instead of asking someone to close the door, I walked over to do it myself. As I got close to the door, I started turning towards the class and closing the door at the same time. The door opens into my room, so I was pushing it closed away from me. Turns out, not all the students were in the room. For some reason, one boy was straggling behind. I closed the door on Steven's face. My only clue was the loud clunk and the burst of laughter from my students. Since I had been addressing them as I went to close the door, they were all looking at me and saw me shut the door in his face!

Startled, I opened the door to see what had happened. I had knocked him onto his butt, and he was sitting on the floor, quite confused and startled himself! Thankfully, Steven has a sense of humor. I asked if he was okay and gave him a hand to help him get on his feet again. Meanwhile, the class was roaring with laughter. Even as I tried to start the lesson again, I started laughing more. It was just one of those moments!


The other classes that ALWAYS cause me to laugh are PreK and Kindergarten. The kids say and draw the funniest things!

For example, take this little girl named Rachel. She's in kindergarten. This picture is from the first week of painting. She told me "Miss M, I'm an artist. You know how you can tell, see how I paint the corners! I could paint all day. I could paint for a whole hour!" She was so excited to be painting!


I also got a kick out of William's painting. At the beginning of class, I explained to the kindergarteners what they need to be ready to paint. I compared it to a place setting for a Western meal. We looked at a drawing on the board of a plate, cup, napkin, knife, fork, and spoon. We mentioned how we would need different things to eat Chinese, like chopsticks. All those things make us ready to eat our food.

Next to the place setting, I drew their painting set-up. We compared the picture to what they had at their seat. I explained each item--their paper, paintbrush, water cup, paint palette, and spongebob (I don't think I've explained spongebob yet...for another post). Then it was time to paint!

As I walked around the class, I realized William was inspired by my place setting picture. Check out his painting! And if you look above him to the white board, you can see my place setting on the left and painting set-up on the right!

Friday, November 21, 2008

Awesome Autumn Art

When I started thinking about my elementary art curriculum, I decided I wanted to do eight types of art projects each year with my students. Structuring the program this way, I would expose the students to many types of art, and build on their knowledge each year. Ideally, we would do two types of art each marking quarter.

In the book The Art of Teaching Art to Children, the author has five or six categories. I started with this list, but adapted it to my leanings. My eight:

Drawing
Painting
Printmaking
Collage
Sculpture
Ceramics
Weaving/Fibers
Design (product design, graphic design, architecture)

I don't know how successful I will be at touching all eight categories in each grade. Check back in June for that update.

2nd grade recently finished a printmaking project. I took Intro to Printmaking in college for my multiples requirement. Unfortunately, we did mostly intaglio printmaking--etching, aquatint, etc. I did entirely intaglio projects. Metal, acid, large printing presses. Not exactly appropriate for 7 and 8 year olds.

Our professor did introduce collagraph as an optional technique. I never tried it, but my roommate was a big fan of collagraphs. My other small taste of collagraphs was a lesson I observed while student teaching in the UK. The teacher made collagraphs with his 11th graders.

I decided to do collagraphs with the 2nd graders. The Art of Teaching Art to Children gave me good ideas about how to adapt this process for young children.

I wasn't sure what I wanted the students to make collagraphs of...what was the subject? I just knew I wanted them to explore collagraphs as a type of printmaking.

I wrestled with the subject matter for a while. I hate arbitrarily deciding subject matter. I really want my art projects to be an extention of learning in the classroom. Why should I draw ocean creatures with 4th grade if 3rd grade does a science unit on the ocean? I tried to find out more about the 2nd grade curriculum. They were about to start a science unit on solids, liquids, and gasses. I couldn't figure out how to tie that into collagraphs. The social studies unit--autumn and thanksgiving.

I wasn't very inspired. Eventually, it was the day to start the collagraphs and I still didn't have a subject matter for the project! Sometimes, all it takes is a little pressure. I don't know why I didn't think of it earlier, but autumn leaves! We could make collagraphs of leaves. The students could look at different types of leaves and draw one large leaf on their matboard "plate." Then, using string, cardboard, window screening, and fabric, students could define their leaf.

If I could do the lesson again, I would get real leaves for them to draw. Not having any trees that actually belong to me, I was nervous to begin snatching leaves from trees around China. In China, even without posted signs, everyone knows not to walk on the grass. Grass is for looking at, not walking or sitting on. I wasn't sure about the philosophy towards trees and their leaves, but I didn't want to test it. Even the trees on our school campus weren't up for picking. We rent our space from another school, and I think the tree leaves are probably not part of the rental agreement.

Instead of real leaves, I printed out photos of leaves from the internet. Students drew their leaf and started the collagraph fun! I suggested they use string to define the outside of leaf and the veins. Another material would be perfect for filling the background.

Some students picked up on defining shape through textures (or lack thereof). Other students could not think through the process and wanted to use green materials for their leaf.

After two classes, the plates were a collage of materials! My TA used some type of furniture varnish to seal the plates.

The printing day arrived! We didn't have printing ink, so I decided to mix up tempera paint in four autumn hues: deep red, rusty orange, mustard yellow, and brown.

I didn't test my plate first, but went right into the demonstration in front of the students. Ooops! Turns out brayers and tempera paint are a BAD combination.

Change of plans. We used wide paintbrushes to apply the paint to our plates.

I told the students to write their name on the lower right corner of their paper. They were also to number the print. One of the special things about printmaking, I explained, was once you have a plate, you can print it over and over and over and over and over again!

They were to leave their paper at their table, take their plate to the "inking" table, paint on one hue, take their plate back to their table, place it face up and put the paper down on top. We found it worked better to press the paper into the plate, rubbing our fingers all over the paper to press it into the plate, then trying to stamp the plate down onto paper.

The results were certainly mixed!

Here's one print that turned out great! I let the students switch their paint color, so this student has a little left over yellow mixing into his red print. I think it looks all the more charming for the yellow.


The first day of printing was just before parent/teacher conferences. I took some of the prints from each student and put them up on a bulletin board in the elementary building. Here's a shot of three different prints. The middle print is from the same plate as above. The other two prints are also quite successful for 7 and 8 year olds!


I decided to do a second class of printing. This class started with a mini-critique of the single-hue prints. We looked at some examples of prints and discussed which leaves were easy to see and which leaves were hidden. Looking at the plates, we talked about why certain plates hid their leaves, and other made them easy to see. We then talked about what we could do to make all the leaves more visible. Since we weren't going to change the plates, I suggested we use two different colors of paint--one for the leaf and one for the background!

Interestingly, many of the plates that did well with the single-hue prints seemed less successful in two colors. The leaves were so visible in the first set of printing because of the use of positive and negative space. Most often, the leaves were white with printed vein lines. The other plates, though, had printed textures inside and outside the leaf, so everything just printed in the one color.

Now, using two colors, the first set of successful plates didn't look any better. If anything, the second color distracted from the positive/negative space. On the other hand, the plates without negative space really benefited from the second color. Everything still printed as positive space, but inside the leaf was one color, and outside another. Here's two examples of these prints.


Here's the bulletin board. I'll need to change it soon since Autumn Art doesn't seem appropriate for December!

I think for an experimental project, the results were great!

Wednesday, November 5, 2008

Afterschool Art Takes the Cake!

One fun thing about my job is afterschool art. Students sign up to stay afterschool for one hour and participate in different activities. In September and October, the session was five weeks long. A whooping 24 first, second, and third graders signed up for Monday afternoons. It was a nice treat that only 8 fourth and fifth graders signed up for Wednesdays.

For this session, I decided to do an exploratory art theme. On the first day, I told the 4th and 5th graders we would be studying verbs. The confusion was beautiful.

Was this afterschool English class?

I asked them to list verbs for making art: draw, paint, collage, print, sculpt... I explained that each week we would be exploring a different verb from this list of five.

For drawing, we did mixed media work combining colored pencils, oil pastels, crayons, markers, and other drawing media.
For painting, we learned various watercolor techniques.
For collage, they made representational and non-objective work.
For printmaking, we made styrofoam prints and monoprints.

Eventually, it was the sculpting week. I couldn't decided what material to use. Third grade made cardboard sculptures. That would be one possibility. Fifth grade was already in the middle of a wire sculpture project during their class time. Clay would be impossible.

Suddenly, it came to me. My principal told the 4th and 5th graders we could have ice cream on the last day if their artwork was A-quality. (They'd been asking about grades for afterschool art, and ice cream seems like a good grade!) Given the situation with dairy, it seemed like a great alternative would be CAKE SCULPTING!

Family Fun and Ace of Cakes became great resources. I made two round cakes, one square cake, and 6 cupcakes. I also bought two cans of white icing, Skittles, M&M's, and Fruit by the Foot in various colors.

Once again, I used the "catch them off guard" motivation tactic. I don't know the official name, but I'm sure Julia taught it to us in Early Field. I told the class we all needed to sit at one table. I asked them what types of materials are used to make sculpture. Clay, stone, metal, wire, cardboard. They listed some main ones. We wouldn't be using any of those materials. We were using something new, and before we made our sculpture, we needed to research this kind of sculpture on the Internet. At this point in time, I played some Ace of Cakes videos from FoodNetwork.com. You should have seen their faces...a lot of confusion, for one. An American girl whispered under her breath "wait, we're using cake?" For other kids, it didn't click until I carried the cakes into the art room. Yes, we were using cake!

On Ace of Cakes, they talk about using standard round and square pans, then cutting and carving into the shapes. At this point in time, we looked at some cake designs from Family Fun. I printed out instructions that consisted of cutting cakes into different sections and reassembling with icing to create pencils, panda bears, and more. Before we decided on a design, we cast our collective vote in a web poll for the best cakes on the Family Fun website. There were some inspiring designs!

Someone offered a palm tree for our design. I liked the idea. It seemed mildly challenging, but doable. The square cake would make a great tree trunk. The round cakes could be cut into palm fronds. Lastly, the cupcakes would make cute little coconuts!

We began cutting. The kids were quite hesitant, but I reassured them we could always "glue" pieces back together with icing. I scored guidelines for the cuts onto the cakes and let different students hack away (using butter knifes)! We also trimmed the cupcakes to make them more spherical.


The next step was a base coat of icing! Still, the kids were a little too delicate. It was getting mighty close to 4:00, time to go home! I found the best method to expedite the process was to slop a huge glob of icing in a section and let the kids spread it around. Each student took turns icing the tree. For time's sake, we decided the sides didn't need icing.


We had a little extra cake from the round pans and decided to make some sand for the tree. Of course, all the small trimmings had already been consumed by the crew, but these were large chunks!

After the base coat, the decorations kicked into gear! It was an all-out mad house as they quickly covered the fronds with anything green, the trunk with brown and purple items, and the sand with yellow and orange. We decided to leave the chocolate cupcake au natural because of their brown color.

Thankfully, we didn't need blue or red items. Those candies made for extra snack!


Eventually, it was time to cut the cake! We barely had enough time to give each kid some cake and send them to the bus with their treat.

Between the nibbles of cake and candy during the sculpting, and the LARGE portions of cake they took on the bus, I'm pretty sure none of the kids wanted dinner that night!

The next morning, as one fifth grade class came to art, they said "did they really decorate a cake yesterday in afterschool art?" It was true, and a few stray bits of icing and cake crumbs around the room confirmed it!

Here's the whole crew with our Palm Tree cake sculpture!


So yummy, Christopher is licking his fingers in the picture!

Sunday, November 2, 2008

Why I Love 3rd Grade

Third grade is the only grade I have yet to write about. Funny, because I love the classes. I have two third grade classes and one ESL class that is a mix of second and third. I've been doing third grade projects with them.

Our second project for the year was a sculpture piece. We spent a lot of time discussing the difference between 2D and 3D things. Alexander Calder was the artist inspiration. We looked at his stabiles and mobiles. You'd be surprised--even with 85% ESL students at our school, many of the kids were familiar with baby mobiles above cribs!

Calder took flat sheets of metal and combined them to create 3D sculptures. Obviously, we couldn't work in sheet metal. Instead, corrugated cardboard was the building material.

The project took three class periods. The first was construction. The second was construction and base coats of paint. The third was details with paint.

The idea for the project came from a project my co-op taught during my early field experience. She had more constraints on the assignment. I just let the kids go for it! Some went abstract. Others went for representation. The goals for all students were stability and utilization of space.

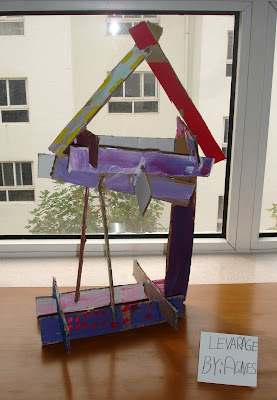
One impressive sculpture was Levarage by Agnes. First of all, the title! She's an ESL student. I'm not sure where she came up with the word "leverage." Second, she went for the open house feel. Some students were hesitant, but she jumped in. Right away, she cut her cardboard into these long strips. She then began assembling them, carefully balancing the beams to create her house.

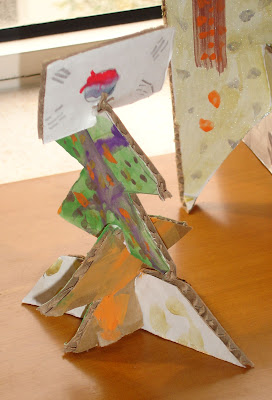
Another fun sculpture from ESL: Christmas Tree Korea! Fred made this Christmas tree. For some reason, instead of a star or an angel at the top, it has the flag of South Korea. Our school is almost 70% Korean. It's amazing where this flag shows up in art class. His tree is also partially orange. I'm not sure what that's about...apparently Asia doesn't limit Christmas to red and green.


As the weeks went on, I thought "what am I going to do with all these sculptures?" Thankfully, I had counterspace to store them while in process. At the end of the project, I asked the librarian if we could use the top of the bookcases to display our work. She obliged, and we had instant exhibition space!

The kids titled their work and labeled small cards to place next to their work.

Transporting the sculptures down two flights of stairs and up two more, from the Fine Arts building to the Elementary building, was quite a feat! Some sculptures were in need of repair by the time we reached the library.


Overall, I think it was a success!


Here are the sculptures in the library:


Our next third grade project involved drawing from observation. Once again, these kids blew me away!

I borrowed a bike from a staff member. I rearranged the room so all the tables were around the perimeter of the room except for the middle table, which held the bike. (Note to self: this was a pain! The three classes meet on three different days! Lots of rearranging of tables and lifting of the bike...)

I told the students this was a challenge. Drawing a bike is a HARD THING. I had to draw a bike in high school. They were only in third grade! Where do you even start?

Here's where I pulled out some Mona Brooks. I decided to forgo the "circle" and "dot" families (confusing for ESL students, since we're not talking about circles as defined in geometry). Instead, we focused on straight lines, angled lines, and curved lines. With each type of line, we found examples on the bike. We also did some interesting body movements. Too bad I can't effectively demonstrate those on the blog. Here's my attempt:

        Straight line: simple, arms out straight to the sides, parallel to the floor.
        Angled line: a little "robot" or "walk like an egyptian" action here. bend at all the joints.
        Curved line: ballerina bends here, trying to make your arms as curved as possible.

I tried to stress drawing what you see, not what you know. We looked at the bike from different angles. Sometimes, the wheels don't look like two big circles. Sometimes they look like rectangles. This was a challenge for some students. Some sat staring at the bike head-on, but drew the bike in profile. I told them what a lovely drawing they did, but that's what the bike looks like from the side. They should do another drawing to show me what the bike looks like from the front. We talked about squished circles, too, when the wheels were at an angle.

We began drawing with standard drawing pencils. Most of the class supply are HB. Some of the third graders had already discovered 2B and 6B among the bunch, and learned the difference. Still, basic graphite drawings. I told them to pick one part of the bike, draw it, then use lines to draw the part that connects to that, and then use lines to draw the part that connects to that, and then use lines to draw the part that connects to that.

When the kids told me they couldn't draw something, I asked them "what kind of lines do you see?" Once they told me, I said "Ok draw it."

Some students barely finished one drawing. Others did two or three. When they were finished, they moved to a new part of the room to draw the bike from a new angle.

The next week, I pulled out the ebony pencils. The richness of the line made for some interesting drawings. I stressed using the pencils in different ways--sometimes pressing lightly, sometimes pressing hard. Sometimes doing lines, sometimes filling in the shapes. Some of these drawings were gorgeous! They had the perspective down a little better, and the variety of tones were so interesting!

Below is a drawing from that week. This student, Paul, draws such energetic scenes from his imagination. His understanding of perspective and line quality shocked me! To be so imaginative and also able to draw from observation beautifully! The front handlebars of the bike are rotated to the left, so the front wheel was angled, and thus a "squished circle."


When I look through all the drawings of the bike in his sketchbook, he just gets it. He sees it and he can tell me what he sees using the pencil! I can't believe a third grader did that drawing!

The third class period was colored pencils. We talked about naturalistic and expressive use of colors (without those terms).

At the end of each class period, each student picked their best drawing for the day. We gathered together and looked at all the best drawings. Sometimes we said two positive things about each work. Other times, we looked at drawings that effectively used value or color and discussed how they did that.

The fourth week started by looking through the sketchbooks. Each student picked their best drawing. Using that as a guide, they found the spot in the room where they could draw the same view of the bike. Each student got a larger piece of nice drawing paper (compared to the A4 copy paper of their sketchbooks). They did a similiar drawing, using the previous drawing as their guide. All class period was spent on this one drawing. As a final piece, these drawings were displayed around school.

Another reason why I love third grade: I stopped by a staff member's house last Friday. His son is in third grade. The son came up to me and said "I've been drawing my bike." See, in China, we keep bikes in our apartments. His is in his living room, and his mom confirmed that he's been drawing it on a regular basis!

Search This Blog

Total Pageviews


  © Blogger template Shush by Ourblogtemplates.com 2009

Back to TOP