Showing posts with label 3rd grade. Show all posts

Saturday, November 5, 2011

Self-Portraits on Display (again)


Another year has come and gone, and so third grade has once again created collage self-portraits.

The bulletin board last year
was such a hit, both in school and on the web. This year, though, bulletin board aesthetics have been on my mind. I decided to make a slight tweak to last year's display, aligning the work in a perfect grid. I typically go for the sporadic arrangement because it is less work. My perfectionist tendencies would measure and calculate for hours to find a suitable configuration. This year, though, I stumbled upon a brilliant way to align the grid. I am sure many already do this; it must be plastered across website. But since I just this month thought through the process, I thought I would share it.


I was thinking to myself...what if bulletin boards had subtle gridlines, like the back of nice wrapping paper? It would make it so nice to arrange the work. Then I realized---I could create a horizontal center line for myself with yarn! A meter stick, some staples, and I was set. I added an extra staple at the center point of the horizontal line to know where to start with my artwork. I then proceeded to hang the work, eyeballing an equal space from the yarn and from the other work. When all was stapled, I took down the yarn and added the peek-a-boo name tags to guess which student created each self-portrait.

Now that arranging artwork on a grid is so simple, I am sure I will do it more often. I do love clean lines!


Thursday, June 2, 2011

Beautiful Batiks

This is my third year of third grade Wayne Thiebaud-inspired art. I teach the lesson just after the students have covered 3D solids in math class (triangular prism, cylinder, etc.). We learn how to draw 3D solids, then we mix tints and shades to paint our delicious treats. This year, I made a small departure from the standard tempera project. Having just visited Shanghai and seen the toothpaste/aloe vera lotion batik process first-hand, I decided the process would be great for our cakes.


Well, the results are in! I loved the project so much that I chose to display batiks in the gala for almost half of the third graders. (Typically, I try to equally represent every project from the year.)

Here are some of the batiks from the gala...

Saturday, April 16, 2011

Batiks of Baked Goodies

Last month, I had the privilege of spending five days in Shanghai for a "business trip." The first two days were spent at an ACAMIS (Association of Chinese and Mongolian International Schools) meeting, followed by a day of break (including a trip to IKEA), then two days observing art teachers at other international schools.

Monday was spent at Shanghai American School, Puxi Campus. The school is significantly older and larger than ours, with an elementary school that has two art teachers and an art TA. I first connected with one of their art teachers through her blog, Art is Messy. Her Malaysian Batik project impressed me two years ago. Last month, I was able to see another batik project, Peace Banners, installed in the entryway of the elementary building, and talk about the process in person.

A curious process, the batik uses a resist made of equal parts aloe vera lotion and toothpaste. I mixed the concoction in an empty paint bottle, then filled small glue bottles.

Third grade is using this process to complete their cake paintings. In the past, we have created tempera paintings based on Wayne Thiebaud's work, emphasizing drawing 3D solids (cylinder, triangular prism, etc.) and mixing colors (tints and shades).

This year, the students are creating batiks. After practicing in their sketchbooks, students drew their design on a large piece of matboard (40cm square with a 5cm margin). Pencil drawings were traced in permanent marker to be visible through the thin cotton muslin. I taped the fabric to the back of the matboard. Once the students' glue lines dry, they will be using tempera paint to fill in the sections. The final projects are soaked briefly in water, then rinsed under a faucet. The pressure of the water from the faucet is enough to remove the resist, exposing the unstained white fabric.


This week, I've been testing the process, working a few steps ahead of the students. I am so excited about the results! The 4th and 5th graders are as well, and begging to let them do a batik project. For now, I'm enjoying the sweet candy/toothpaste smell filling my classroom from the resist and trying to decide how we will display the final projects. Perhaps we'll have them made into pillows for the library!

Monday, November 1, 2010

(masterpieces) Self-Portrait

(teacher's note) 3rd grade reviewed facial proportions as they used a mirror to draw self-portraits---pictures of themselves! After reading a book about the different colors of everyone’s skin, they helped friends choose the best colors for their skin and hair. Using their drawing as a template, they cut and glued each piece of their self-portrait. Cindy did a great job with her facial proportions! Check out the hallway on the second floor of the Fine Arts building for more 3rd grade self-portraits. See if you can identify the artists!

Monday, October 25, 2010

Who Am I? Third Grade Self-Portraits

I still remember the day, my first year in China, when third graders used the orange and brown crayons to color the skin of their classmates. True, it was only two years ago, but I was thoroughly embarrassed to see my students coloring each other with rainbow hues. Most of the students shared four broken pieces of "apricot," creating a class full of stereotypical peach people. One student even used a black crayon to color the skin of his Asian classmate. Before Christmas rolled around, I had ordered a few boxes of Crayola multicultural crayons.

Later that year, the same class did cut paper self-portraits. I looked at my abundant supply of construction paper, and to my dismay, realized naturalistic colors just would not do. For two years now, I have taught third graders about Fauvism mainly because I do not have appropriate paper for skin tones. Correction, did not have appropriate paper.

I ordered many shades of brown construction paper at the end of my first year, but our shipment from the states did not arrive until late fall, after third grade finished the project with Fauvist hues. This year, I almost considered keeping the Fauvism aspect; the kids love the results and it is a good experience to liberate color from the natural world. But I just had to try natural colors, at least once.

As we were working on facial proportions, I stumbled upon the book The Colors of Us in the kindergarten classroom. The young artist describes all the people in her neighborhood in food words: cinnamon, honey, peanut butter, etc.. I read the book to the third graders, then gave them swatches of the colored paper. They helped their classmates identify appropriate colors for their skin and hair.

I love the results! For many of the students, it was a review of drawing portraits, as they drew portraits of teachers at the end of last year. This time, a mirror replaced a small printout of yearbook photos. Another change was switching the media from tempera paint to cut paper. I loosely base my procedure off of these step-by-step instructions for cut paper portraits (though I make the paper 9 in x 12 in, add more emphasis to the drawing details, such as shapes of the jaw-line, eyes, facial proportions, etc., draw the nose differently, and don't use any sequins or other paper---only construction paper).


To display the work, I hung every self-portrait in the hallway with a sign "Who Am I?" Under each work, I stapled a folded piece of paper. Viewers can guess, then lift the flap to reveal the identify.

It's created quite a splash at school!


Sunday, October 17, 2010

(masterpieces) Cardboard Sculpture

(teacher’s note) 3rd grade explored artwork in three dimensions! After looking at sculptures by Alexander Calder, 3rd graders cut and notched pieces of cardboard into 3D art. They finished their sculptures with a coat of paint. Sarah made a great little cat!

Sunday, November 8, 2009

Year Two silliness...

It's bicycle time of the year. Yup, third grade is drawing bicycles again. This year, I wised up and scheduled the unit to overlap with fourth grade's figure drawing. Both drawing units require the same classroom configuration---two tables in the middle, the rest of the tables facing in. Amazingly, third and fourth grade are the only classes I teach on Tuesday and Thursday!

I did some quick calculations and realized I moved my room into this configuration, then back to normal 18 or more times last year. 36 times moving the tables...

This year, it should be only 8 round trips for the tables---8 set-ups and 8 returns to normal. (Being a 2nd year teacher is awesome. Planning in advance, I love it!)

The drawings are turning out well. I'd post some pictures, but my camera died :o(
This post isn't about their drawings anyway. It's about the silly things they say...

Remember my buddy Fred? He made Christmas Tree Korea. His brother, Jerry, spelled his name Favd and drew a yellow ocean...

Well Fred is making me laugh again.

To help them draw the bicycle, I need to get very close to them and see their eye-line to the bike. Mind you, third grade is mesmerized by this task of drawing the bicycle. They work silently, and not at my request. As I was up close and personal with Fred on Thursday, he loudly announced "you smell good." Nervous about my kimchi breath from lunch (Korean fermented spicy cabbage, pretty rough on the breath...), I said "maybe it's my Korean lunch." I'd only finished eating about 15 minutes before they came to class. "No, it's your skin! You smell like...chocolate!"

Seriously? Too funny. And the whole class heard. I tried to hold back the laughter! On top of all that, I was being observed by my department head. She was cracking up in the corner! At least smelling like chocolate is a compliment, I think...


Another funny comment came at the end of class. As third grade was lining up in the hallway, my department head (and good friend---she teaches elementary music) was walking through their class line to cross the hallway into our fine arts office. Tommy stopped her and said "you and Miss M, you're like best friends, right?" So cute! And she is one of my best friends in China...

Monday, March 16, 2009

Wonderful World of Weaving

Weaving has taken over my school...at least in the elementary department. Back in November, my third graders started weaving. The project was based on something I saw during my Early Field placement. We began with some basic information about weaving. My beautiful, hand-woven scarf from Megan made an excellent visual! Looms, woven metal, woven plastic netting, and even traditional fiber weaves. Then the students received a rectangle of burlap. We talk about patterning, which is very important in weaving. The kids came up with a pattern for which rows they would remove from the burlap.

Keep 9, remove 2, keep 4, remove 2, keep 9, remove 2, etc...


The next week, we learned about
six different color schemes:


     Light and Dark (monochromatic)
     Warm Colors
     Cool Colors
     Opposites (complimentary)
     Neighbors (analogous)
     Neutrals

We looked at some art images, identified the colors in them, and named the color scheme. Then the students chose which scheme they wanted for their weaving. Afterwards, the magic began!


Many students were able to thread the large, blunt needles on their own. Others needed help from me or Mrs. Yang (my TA). A few art classes later, most students had completed the whole weaving! For the students that didn't finish for one reason or another (worked slowly, missed classes, etc.), I simply cut the burlap into a shorter rectangle. Then Mrs. Yang sewed all their names onto the weaving for easy display on bulletin boards.


The next weaving project was with fifth grade. We had just a few class periods before our Christmas break and the end of the semester. I decided to use that time to review three things the students should already know...warm and cool colors, the basics of using watercolors, and weaving.

It's especially hard in an international school to know what the students have learned already. About 2/3 of my fifth graders are new this year. For the rest, they've had four different art teachers from 2nd grade until now!

I showed the students some watercolor basics and asked them to explore, creating one page of warm colors and one page of cool colors. After the pages were dry, they were allowed to cut them into strips (1-3cm wide) and weave them in any way they saw fit. I encouraged experimentation during the whole process.


Finally, first grade got their turn. Again, I based this lesson on something I saw in Early Field. We started by making our paper loom. I decided it was important for the children to make it themselves. I stepped them through the process, emphasizing that they needed their "listening ears" that day in class, and they MUST follow directions!

We started by folding our paper in half, hamburger-style.

Next, we put the bottom of our ruler along the fold and drew a line across the top of the rulers. What a coincidence, the students were learning about rulers in math class! One function of a ruler, to draw a straight line!

Then we used our ruler to measure--another ruler function. We put the left end of the ruler at the edge of the paper. I wanted the students to make every 4 cm along their line. I started explaining this by saying "Put a mark at 4cm. Now we need to add 4. What is 4 plus 4? 8, so put a mark at 8cm." As I was stepping the students through the process, it just came to me. Our ruler was simply a NUMBER LINE! The first graders spend a lot of time using a number line. I was able to draw the hopping arrow to show the kids how to count up four numbers on the line, and in the process, add 4!

Once they'd marked every four centimeters, they switched to the fold side. This time, they placed the top part of the ruler touching the fold. Again, they used their number line and marked every four centimeters.

Next, we turned the page so the fold was on the left. I identified the drawn line on the right as the STOP line. This was very important! They used the ruler to connect the dots from the fold to the STOP line, drawing with their pencil from the fold to the STOP line, at which point in time, they STOPPED! If you haven't taught first graders, you wouldn't understand how important it was to say this, say it again, and make them say it over and over!

Once their lines were correct, they were able to get scissors. They started with the fold close to their body and cut along the line. What happens when they get to the STOP line? You STOP! Really, you'd think I was crazy if you saw me actually explaining this to the kids...over and over, loud and dramatic!

Amazingly, they were all successful!

The following week, I demonstrated the UP and DOWN motion of weaving. We looked at the checkerboard effect, talking a lot about doing the opposite thing as the previous row. The students were given a selection of neutral strips--white, light grey, dark grey, and black. They were to create a pattern in their strip choice. Some stuck to the tried and true ABABAB pattern. Others attempted something more complicated.

The final class period was spent using oil pastels to draw patterns on the checkerboard. The kids really liked using their name in the pattern.


In February, I attacked our school with all three weaving projects. In addition to the two bulletin boards outside my room, I convinced classroom teachers to lend me their hallway boards for a few weeks. I intermixed the projects, trying to put the work of one child next to their brother or sister's classroom. Usually, they're really proud of their sibling's work!


My attack was purposeful--in February, we offered Weaving as an afterschool activity for the students. Many of the 4th and 5th graders had seen the burlap project and asked about weaving. I think my media campaign was successful! There are about 10 students in the activity on Monday (lower elementary) and about 5 on Wednesday (upper elementary). Since I'm teaching Computer Art at the same time, Mrs. Yang came up with the weaving projects and teaches them to the students. So far, lower elementary has done many smaller weavings. Upper elementary is still working on a cardboard loom. Both sets of kids seem to love it!


Thursday, January 15, 2009

Turning into my "mother"

I don't actually mean that I'm turning into Momma Mel. (Well, that might be true too...)

I was thinking about that perennial story, that one where new parents realize they are literally turning into their parents--the things they do, the things they say.

It's not that I'm intentionally replicating the art teachers I've had...it's just the main experience I have to go from when deciding how to do things.


About a month ago, I was overwhelmed by a bunch of pieces of scrap paper. It was all A4 copy paper, some white, some colored, and all used on one side. I didn't want to put it in the recycling bin. I also didn't have a jelly jar cabinet with that teal tray where we collected scrap paper in my kitchen in Pennsylvania.

I don't know where the idea came from, but I went to my paper cutter and chopped the paper into quarters. I think that means the paper is now A6.

I took the stack and put it on my desk. Now I use it to write quick notes, to do lists, etc. I wish I had a little beige metal tray to contain the stack. Then I would truly be copying one of my high school art teachers, Cathy Kammler!


In another such moment, I found myself singing (in my head) about the primary colors:

Red, yellow and blue
I see you, I see you
You are the primary colors
You make all other colors
I wish I were a color like
Red, yellow and blue

My elementary art teacher, Mrs. Blahut, used to sing this song to us. It wasn't until I was thinking about writing about this experience, "turning into my art teachers," that I realized the song is actually Three Blind Mice.


This week, I also did one of those things I thought I'd never do: I had my third grade students paint a value scale.

It's not that I intentionally made a pact against the task. It's just so traditional. It's a meaningless,* skill-based, production task.

Especially at the elementary level, students can learn about value and color mixing without making value scales and color wheels! At a basic level, my PreK kids understand tints. Color plus White makes it LIGHT! Adding black makes a color darker. (I wish I could figure out a rhyme for this.)

My kids learn color theory and value through experience. PreK, Kindergarten, and First Grade don't know I have bottles of orange, purple, green, brown, pink paint! I've only given them the primaries, white, and black. They've had to "find" all the other colors!

I haven't painted with second grade yet, but I don't think I'll let them use anything but the primaries, black, and white. I let fourth grade choose from the whole array, but encouraged them to mix A LOT. We were looking at The Peaceable Kingdom by Edward Hicks. As a class, we established that he didn't use any color directly from the bottle (we don't have bottles of yellow ochre, otherwise that might not have been true...). They were intentional about creating just the right blue for their sky (or blue-gray, gray, blue-green, pink-purple sunset, etc.), the right greens for the vegetation, and the right natural colors for their animals.

In third grade, we're painting cakes, Wayne Thiebaud style! I did a lesson with 6th graders in England, so I was very excited when Miss Emily told me about a lesson she did with her third grade students in Pennsylvania. I decided it sounded like fun, plus it didn't require me to make enough cake for the whole class! (In England, I made two layer cakes. Each student got one slice and drew it, using contour lines, in their sketchbook. We then used tracing paper to repeat the image three more times so we had four slices of cake to paint. Of course, at the end of the class, if they had behaved, they got to eat their slice! Drawing from life, classroom management, and a tasty treat all in one!)

For Miss Emily's lesson, we spent the first class period looking at Wayne Thiebaud's paintings and learning to draw 3D solids. Cylinders for the cakes, triangular prisms for just one slice! We also used cones to draw none other than an ice cream cone! A sphere of ice cream, or a rectangular prism brownie! I'm getting hungry...

Between the first class and the second class, I started paging through some old Art Ed magazines in our office. Low and behold, a School Arts from 5 or 6 years ago includes this EXACT lesson! Drawing 3D solids, painting with tints, all while looking at the work of Wayne Thiebaud! I know there's nothing new under the sun, but really! Coming across this exact issue, in China, in the middle of my project!!! I don't know where Miss Emily got her idea, but I doubt she was reading a copy of School Arts from when we were still in high school!

This article talked about having the students do a value scale with different colors, noticing how colors respond when mixed with white or black. I read the paragraph a few times and eventually decided the author had a point. Some colors react funny when mixed with white or black. Who would think that yellow plus black would look greenish?

About 15 minutes before my kids showed up, I made the decision. We would do a simple value scale of the primary and secondary colors. My PreK kids may know what happens when you mix white with a color, but I didn't teach my third graders when they were in PreK. I have no idea what they have learned and how they've learned it! Before they waste a lot of paint and slop some crazy tints on their final piece, they should have a basic understanding of color mixing.


This class period also served as a chance for students to practice mixing on a palette, cleaning their brush, and painting neatly (in the box).

I went around and discussed some of the scenarios with the students. You need a lot of white to really change the color, but only a little bit of black. White is weak, but black is very strong.

One of my students got sick of washing out his brush between colors. He wised up and counted how many more tints he had to make...four. He made four small dabs of white paint on his palette, one on each side of the square palette, and washed out his brush. Then he counted how many more shades...five (he must have stopped in the middle of second color). He made five small dabs of black on his palette, one in each corner and one in the center. He had a little 9 square checkerboard on his palette! He then went color by color, mixing his primaries and secondaries with the white and black dots on his palette.

Surprisingly, the kids weren't bored with the task. They got quite excited about the results, especially the shades. Orange and black looked like chocolate!

This week, we'll revisit Thiebaud's paintings, comparing his colors to the colors on our chart. Hopefully, the kids will decide they need to use lots of tints in their final painting. Then we'll be ready to start painting...


*Not that the task has no value, or that there isn't a place to refine skill to this level, but there is no greater meaning, enduring understanding, big idea to reproducing a color wheel or value scale. I think this type of skill development is a better fit for secondary/post-secondary. Skill development in elementary goes hand in hand with exploration, creativity, and tasks with broader meanings.

Sunday, November 2, 2008

Why I Love 3rd Grade

Third grade is the only grade I have yet to write about. Funny, because I love the classes. I have two third grade classes and one ESL class that is a mix of second and third. I've been doing third grade projects with them.

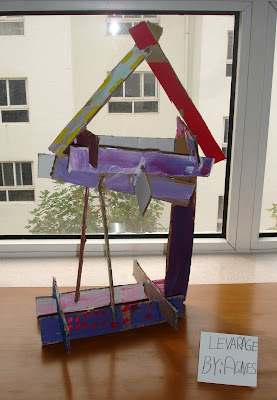
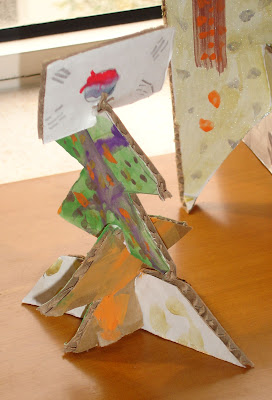
Our second project for the year was a sculpture piece. We spent a lot of time discussing the difference between 2D and 3D things. Alexander Calder was the artist inspiration. We looked at his stabiles and mobiles. You'd be surprised--even with 85% ESL students at our school, many of the kids were familiar with baby mobiles above cribs!

Calder took flat sheets of metal and combined them to create 3D sculptures. Obviously, we couldn't work in sheet metal. Instead, corrugated cardboard was the building material.

The project took three class periods. The first was construction. The second was construction and base coats of paint. The third was details with paint.

The idea for the project came from a project my co-op taught during my early field experience. She had more constraints on the assignment. I just let the kids go for it! Some went abstract. Others went for representation. The goals for all students were stability and utilization of space.

One impressive sculpture was Levarage by Agnes. First of all, the title! She's an ESL student. I'm not sure where she came up with the word "leverage." Second, she went for the open house feel. Some students were hesitant, but she jumped in. Right away, she cut her cardboard into these long strips. She then began assembling them, carefully balancing the beams to create her house.

Another fun sculpture from ESL: Christmas Tree Korea! Fred made this Christmas tree. For some reason, instead of a star or an angel at the top, it has the flag of South Korea. Our school is almost 70% Korean. It's amazing where this flag shows up in art class. His tree is also partially orange. I'm not sure what that's about...apparently Asia doesn't limit Christmas to red and green.


As the weeks went on, I thought "what am I going to do with all these sculptures?" Thankfully, I had counterspace to store them while in process. At the end of the project, I asked the librarian if we could use the top of the bookcases to display our work. She obliged, and we had instant exhibition space!

The kids titled their work and labeled small cards to place next to their work.

Transporting the sculptures down two flights of stairs and up two more, from the Fine Arts building to the Elementary building, was quite a feat! Some sculptures were in need of repair by the time we reached the library.


Overall, I think it was a success!


Here are the sculptures in the library:


Our next third grade project involved drawing from observation. Once again, these kids blew me away!

I borrowed a bike from a staff member. I rearranged the room so all the tables were around the perimeter of the room except for the middle table, which held the bike. (Note to self: this was a pain! The three classes meet on three different days! Lots of rearranging of tables and lifting of the bike...)

I told the students this was a challenge. Drawing a bike is a HARD THING. I had to draw a bike in high school. They were only in third grade! Where do you even start?

Here's where I pulled out some Mona Brooks. I decided to forgo the "circle" and "dot" families (confusing for ESL students, since we're not talking about circles as defined in geometry). Instead, we focused on straight lines, angled lines, and curved lines. With each type of line, we found examples on the bike. We also did some interesting body movements. Too bad I can't effectively demonstrate those on the blog. Here's my attempt:

        Straight line: simple, arms out straight to the sides, parallel to the floor.
        Angled line: a little "robot" or "walk like an egyptian" action here. bend at all the joints.
        Curved line: ballerina bends here, trying to make your arms as curved as possible.

I tried to stress drawing what you see, not what you know. We looked at the bike from different angles. Sometimes, the wheels don't look like two big circles. Sometimes they look like rectangles. This was a challenge for some students. Some sat staring at the bike head-on, but drew the bike in profile. I told them what a lovely drawing they did, but that's what the bike looks like from the side. They should do another drawing to show me what the bike looks like from the front. We talked about squished circles, too, when the wheels were at an angle.

We began drawing with standard drawing pencils. Most of the class supply are HB. Some of the third graders had already discovered 2B and 6B among the bunch, and learned the difference. Still, basic graphite drawings. I told them to pick one part of the bike, draw it, then use lines to draw the part that connects to that, and then use lines to draw the part that connects to that, and then use lines to draw the part that connects to that.

When the kids told me they couldn't draw something, I asked them "what kind of lines do you see?" Once they told me, I said "Ok draw it."

Some students barely finished one drawing. Others did two or three. When they were finished, they moved to a new part of the room to draw the bike from a new angle.

The next week, I pulled out the ebony pencils. The richness of the line made for some interesting drawings. I stressed using the pencils in different ways--sometimes pressing lightly, sometimes pressing hard. Sometimes doing lines, sometimes filling in the shapes. Some of these drawings were gorgeous! They had the perspective down a little better, and the variety of tones were so interesting!

Below is a drawing from that week. This student, Paul, draws such energetic scenes from his imagination. His understanding of perspective and line quality shocked me! To be so imaginative and also able to draw from observation beautifully! The front handlebars of the bike are rotated to the left, so the front wheel was angled, and thus a "squished circle."


When I look through all the drawings of the bike in his sketchbook, he just gets it. He sees it and he can tell me what he sees using the pencil! I can't believe a third grader did that drawing!

The third class period was colored pencils. We talked about naturalistic and expressive use of colors (without those terms).

At the end of each class period, each student picked their best drawing for the day. We gathered together and looked at all the best drawings. Sometimes we said two positive things about each work. Other times, we looked at drawings that effectively used value or color and discussed how they did that.

The fourth week started by looking through the sketchbooks. Each student picked their best drawing. Using that as a guide, they found the spot in the room where they could draw the same view of the bike. Each student got a larger piece of nice drawing paper (compared to the A4 copy paper of their sketchbooks). They did a similiar drawing, using the previous drawing as their guide. All class period was spent on this one drawing. As a final piece, these drawings were displayed around school.

Another reason why I love third grade: I stopped by a staff member's house last Friday. His son is in third grade. The son came up to me and said "I've been drawing my bike." See, in China, we keep bikes in our apartments. His is in his living room, and his mom confirmed that he's been drawing it on a regular basis!

Search This Blog

Total Pageviews


  © Blogger template Shush by Ourblogtemplates.com 2009

Back to TOP